How to Turn on Wifi on Windows 8 Laptop
Z7_3054ICK0KGTE30AQO5O3KA30N0
hp-concentra-wrapper-portlet
![]() Actions
Actions
HP PCs - Troubleshooting Wireless Network and Internet (Windows 8)
This document is for HP computers using a wireless network (a router) with Windows 8.
Wi-Fi networking is a convenient way to access the Internet. However, a lot of things can go wrong when using a wireless connection, and it can be frustrating when the connection is slow, intermittently drops, or cannot connect. The steps in this document provide tools that have been found helpful in solving many problems that can occur with wireless network and Internet connections.

Step 1: Use automatic troubleshooting
Tools by HP or Microsoft can be used to automatically test and fix a large variety of wireless conditions. If your HP computer came with Windows 8, use HP Support Assistant as it has special code specifically designed for HP computers. If your computer does not have HP Support Assistant, use the automated troubleshooter that is built into Windows 8.
Use HP Support Assistant network diagnostics
HP Support Assistant is a software support diagnosis and troubleshooting tool from HP that can resolve many types of network and Internet connection issues.
note:The images in this section might vary slightly from what you see on your screen.
To diagnose and troubleshoot network issues using HP Support Assistant:
-
If your computer has a wireless key or button on or near the keyboard and the wireless activity light is off or amber in color, and then press the key or button to enable your wireless adapter. This key might be the F10 key, F12 key or labeled with a symbol of an airplane.
-
If wireless activity comes on or the activity light turns blue, you have enabled wireless on your system. Try connecting to the Internet again. If problems persist, continue using these steps.
-
If your computer does not have a wireless key or the wireless activity lights remains off or orange, and then continue using these steps.
-
-
In Windows, search for and open HP Support Assistant.
note:
If HP Support Assistant is not installed on your computer, you can go to the HP Support Assistant website to download and install the HP Support Assistant software. If your computer cannot connect to the Internet, and then use Microsoft's Windows 8 automated network troubleshooting built into Windows 8 instead of this step.
-
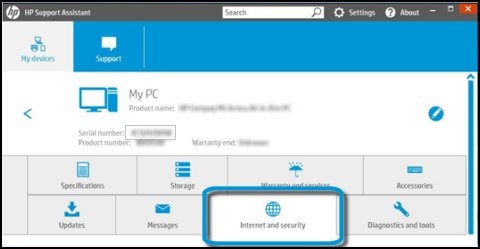
In the My devices screen, select your device from the options listed.
The My devices menu screen displays.

-
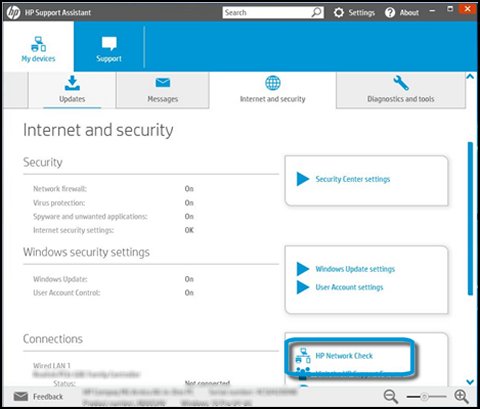
On the My devices menu screen, click Internet and Security.
-
Click HP Network Check.
-
If a User Account Control message opens, click Yes to allow the computer to make changes.
-
On the HP Network Check Welcome screen, click Next to run the network diagnostic.
-
If the diagnostic test finds no issues, close the windows and continue to the next section.
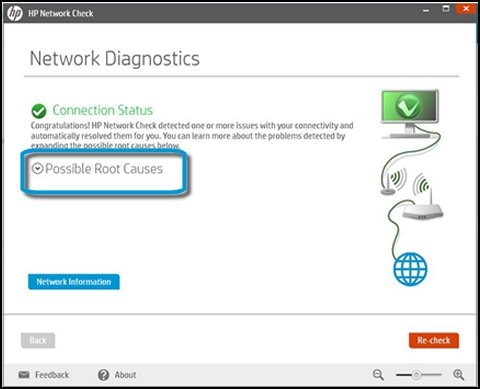
If the diagnostic test finds one or more issues, continue with the steps in this section.
-
Click Possible Root Causes.
-
Click one of the tool icons for steps to resolve the issue, and then follow the on-screen instructions.
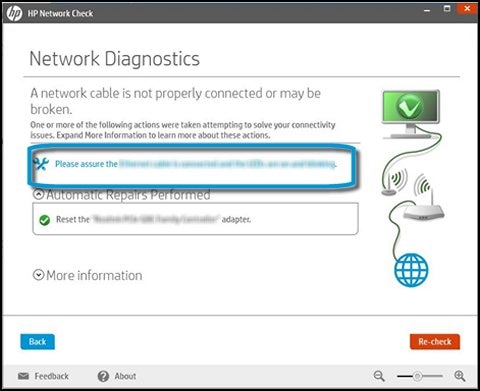
-
After completing the instructions, click Re-check.
HP Support Assistant checks the network connectivity.

-
If necessary, repeat these steps until the network connectivity issue is resolved or all possible root causes and repairs have been completed.
Use Windows 8 Network and Internet Troubleshooter
The Windows 8 Network and Internet Troubleshooter tests the network for problems and attempts automatic repairs for any issues found. Use this tool from Microsoft to test and repair the connection.
-
If your computer has a wireless key or button on or near the keyboard and the wireless activity light is off or amber in color, and then press the key or button to enable your wireless adapter. This key might be the F10 key, F12 key or labeled with a symbol of an airplane.
-
If wireless activity comes on or the activity light turns blue, you have enabled wireless on your system. Try connecting to the Internet again. If problems persist, continue using these steps.
-
If your computer does not have a wireless key or the wireless activity lights remains off or orange, and then continue using these steps.
-
-
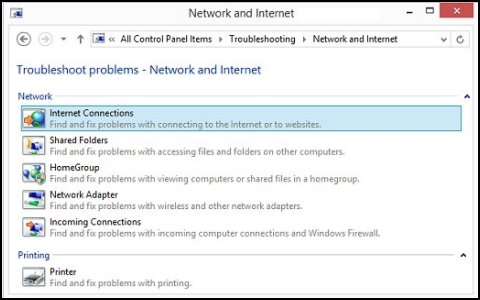
From the Start screen, type troubleshooting to open the Search charm, and then select troubleshooting from the search results.
-
Click Network and Internet.
-
Click Internet Connections.
-
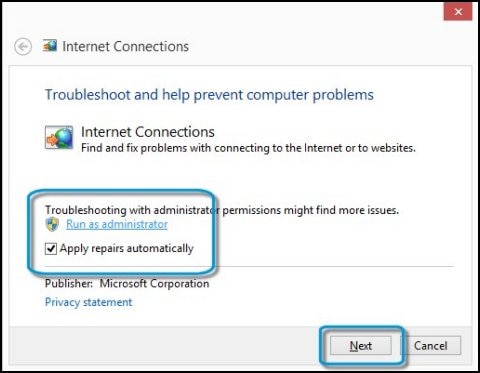
Click Advanced.

-
Click Run as administrator (if present), check the box for Apply repairs automatically, and then click Next.
note:
If a User Account Control window opens, click Yes to continue.
-
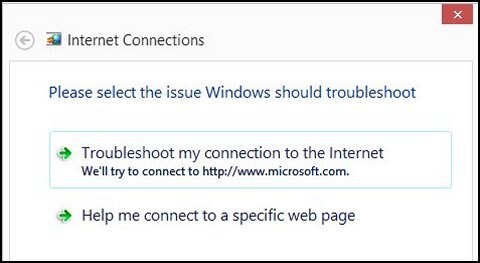
Click Troubleshoot my connection to the Internet, and then click Next.
-
Follow the instructions to check for problems.
-
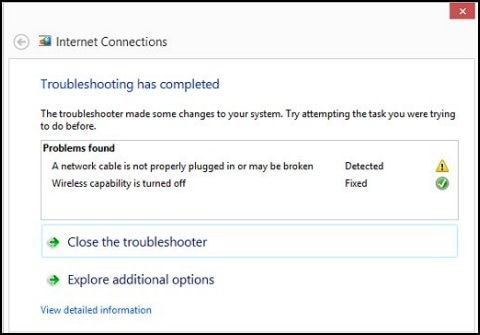
After automated troubleshooting has completed, read the information on the screen.
-
If problems are found, the window provides more information about the problems. This window might also show you what was fixed or actions you can take to resolve the problem. Read the information in the window and perform any suggested actions. Try connecting to the Internet again. If problems persist, close the troubleshooting window and continue to the next step.
-
If no problems were found and your computer is still experiencing Wi-Fi problems, close the troubleshooting window and continue to the next step.
-
Step 2: Reinstall the wireless network adapter driver
Removing and reinstalling the wireless network adapter driver can clear registry values and reset configurations so the driver can be properly set up and accessed by Windows. Use one of the following sections to reinstall your wireless adapter.
Reinstall the Wi-Fi driver using HP Recovery Manager (preferred)
If your computer originally came with Windows 8 and has HP Recovery Manager, you can use it to reinstall the wireless network adapter.
-
If you are using an external USB wireless network adapter, unplug it, restart your computer, and then plug it into a different USB port.
-
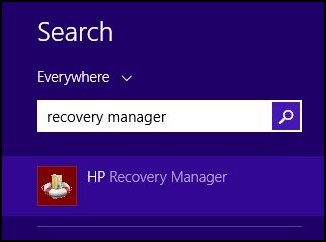
From the Start screen, type recovery manager to open the Search charm, and then select HP Recovery Manager from the search results.
-
If a User Account Control message opens, click Yes.
note:
If you cannot find HP Recovery Manager on your computer, use Device Manager to reinstall the device driver.
-
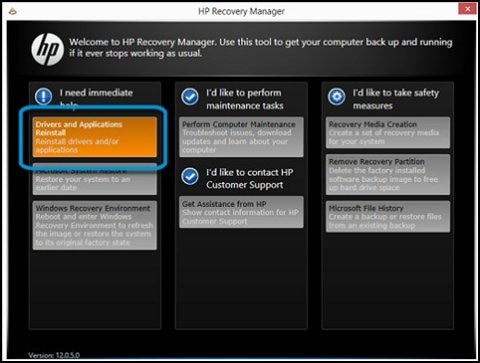
When the Recovery Manager screen opens, click Drivers and Applications Reinstall.
-
Scroll down through the list of drivers and select the name of your computer's wireless adapter.

-
Wait until the driver installs and restart your computer if prompted to do so.
-
Try connecting to the Internet again. If problems persist, continue to the next step.
Use Device Manager to reinstall the driver
If your computer does not have HP Recovery Manager, use Windows Device Manager to uninstall the wireless adapter and have Windows install the driver.
-
If you are using an external USB wireless network adapter or cellular broadband device, unplug it, restart your computer, and then plug it into a different USB port after Windows opens.
-
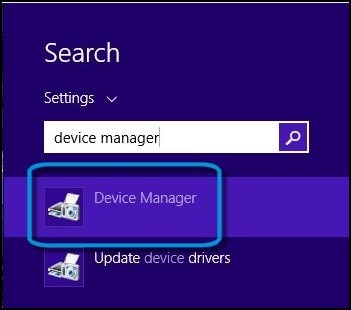
From the Start screen, type device manager to open the Search charm, and then select Device Manager from the search results.
-
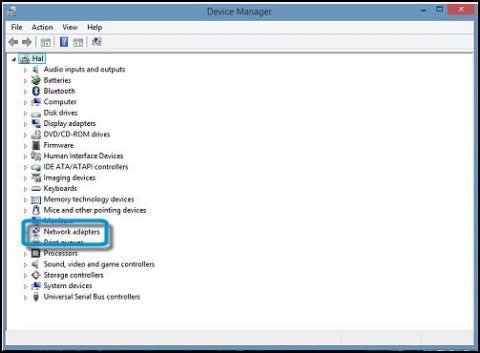
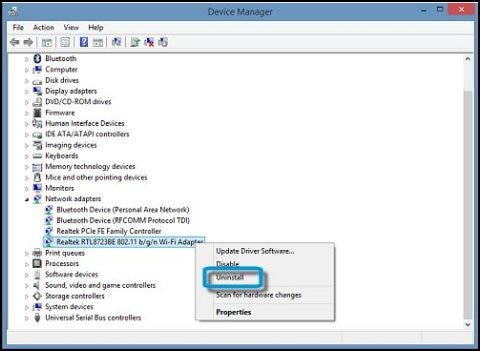
Double-click Network adapters.
-
Right-click the name of your wireless network adapter, and then select Uninstall.
note:
If the name of the network adapter is missing from the network adapters category, the network adapter hardware is not connected or the device driver cannot Plug and Play. If this happens, turn off the computer and check the hardware connection to your wireless adapter hardware. Service the computer if problems are found.
-
When the Confirm Device Uninstall screen displays, click OK and wait for the device to be uninstalled.
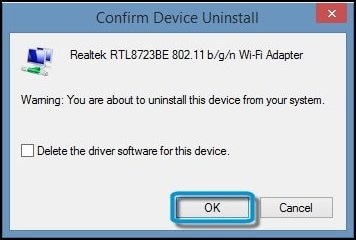
The name of the wireless adapter no longer shows in the network adapters category when it has been uninstalled.
-
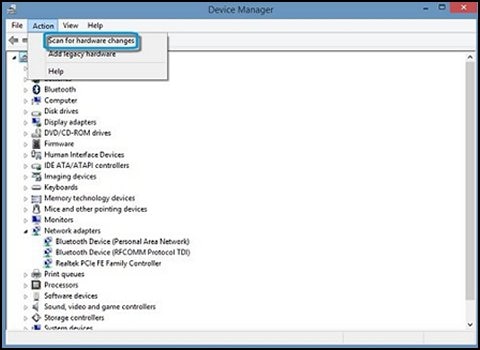
At the top of the Device Manager window, click Action, and then select Scan for hardware changes.
The computer reinstalls wireless network and the wireless network adapter name is shown in the Network adapters category.
-
After the network adapter name appears in Device Manager, close Device Manager, and then restart the computer.
-
Try connecting to the Internet again. If problems persist, continue to the next step.
Step 3: Update wireless network drivers
Downloading and installing the latest driver for your wireless adapter can resolve issues with wireless Internet connections, especially issues related to performance or intermittent dropped connections.
Use one or more of the following sections to find updated drivers for your wireless networking hardware. If you cannot find an updated driver or the updated driver fails to solve the problem, go to the next step.
Get driver updates from HP
HP tests and posts many updated drivers from wireless adapter manufacturers. HP might have a more current version of the wireless driver than the one you are using. To find out if a driver is available for your model of computer, go to the HP Customer Support - Software and Driver Downloads page. If a Let's identify your product to get started page displays, select your computer type, type the model name of your computer, and then click Submit. The product support page opens.
In many cases, the wireless driver is part of a driver package for your motherboard called a chipset. When visiting the HP website, look for a wireless driver first, and then the chipset if a wireless adapter driver is not available. If you need more information, read the details for the software downloads that are available. After you find the driver you are looking for, click the category name, and then click Download.
note:If your computer currently does not have access to the Internet, use another computer with Internet access to download and install the wireless driver softpaq to a USB storage device. You can then connect the storage device to a USB port on your computer and open the softpaq file that was downloaded to update your driver or chipset.
Install any available wireless driver or chipset updates, and then try connecting to the Internet.
If the updated driver fails to solve the problem, go to the next step.
Using HP Support Assistant to find updates automatically in Windows
HP personal computers with Windows come with HP Support Assistant installed. HP Support Assistant can be used to automatically find and install the latest updates for your computer.
note:The images in this section might vary slightly from what you see on your screen.
-
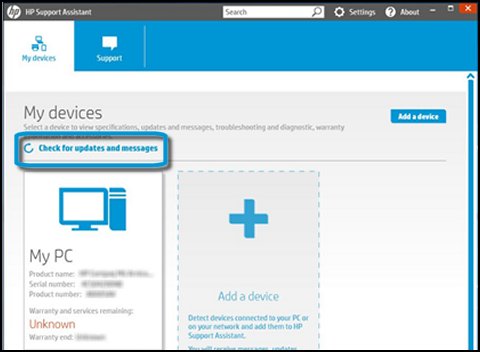
In Windows, search for and openHP Support Assistant.
-
In the My devices screen, click Check for updates and messages.
-
If HP Support Assistant finds updates, the number of available updates displays in the My PC section.
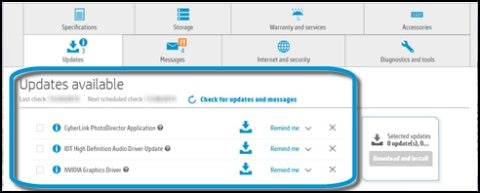
To see the available updates, click the Updates tab.

The Updates available screen displays.
-
To install an update, click the Install now icon
 next to the update.
 -
If the updated driver fails to solve the problem, go to the next step.
Get driver updates from other sites
Other websites might provide driver updates for your exact model of wireless hardware. If you cannot find an updated driver from HP, you can use these steps to see if a more updated version is available from the World Wide Web.
caution:HP does not control and is not responsible for information outside of the HP website. While there are many reputable sites that provide drivers, some sites might be malicious. Download software only from sites you know and trust.
-
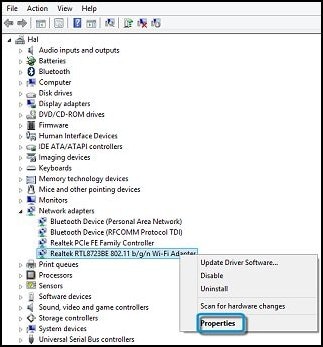
From the Start screen, type device manager to open the Search charm, and then select Device Manager from the search results.
-
Double-click Network adapters, and then right-click the name of the Wireless Adapter and select Properties.

-
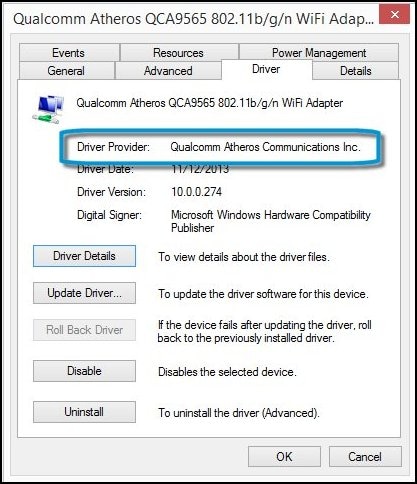
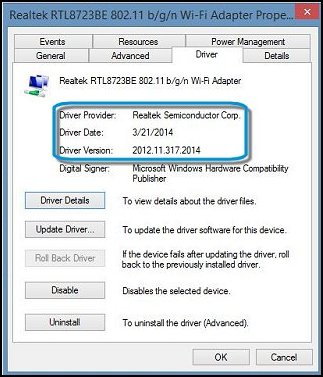
Click the Driver tab and look at the name next to Driver Provider. You might want to refer to the driver date and name as well when looking for an updated driver.
-
Visit the driver provider's website to look for an updated driver. You can find the website by searching the Internet using the driver provider's name.
-
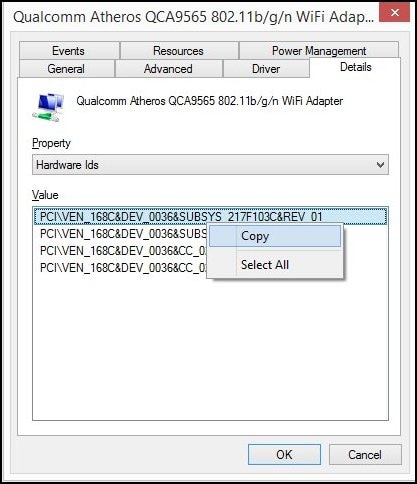
If you cannot find an updated driver on the driver provider website or you cannot find the provider's website, click the Details tab in Device Manager, select Hardware Ids from the Property list, and then right-click the first hardware device ID in the list and select Copy. You can then paste the hardware ID into an Internet search page to find sites that host the drivers.
-
If an updated driver is found, follow the instructions to install it. Otherwise, use another method to find and update the driver or go to the next step to continue troubleshooting.
caution:
HP does not control and is not responsible for information outside of the HP website. Download software only from sites you know and trust.
-
If the updated driver fails to solve the problem, go to the next step.
Install updated Wireless LAN Driver using Device Manager (when an Internet connection is available)
Downloading and installing the latest wireless LAN adapter driver can resolve many issues with a slow wireless Internet connection.
to use Device Manager to find the latest WLAN driver:
-
From the Start screen, type device manager to open the Search charm, and then select Device Manager from the search results.
-
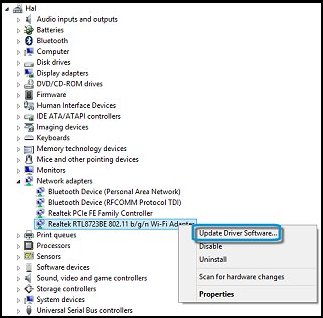
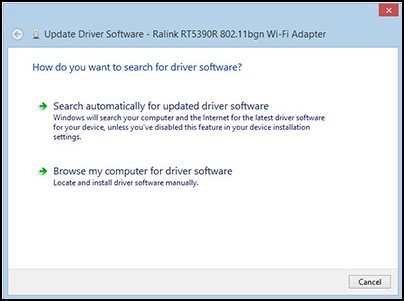
Double-click Network adapters, and then right-click the name of the Wireless Adapter, and then select Update Driver Software.
-
Click Search automatically for updated driver software.
-
If an updated driver is found, follow the instructions to install it.
If Device Manager does not find an updated driver, you can check the wireless adapter manufacturer's website.
-
In Device Manager, right-click the name of the adapter, and then click Properties.
-
Click the Driver tab. Make a note of the driver provider, date and version.
-
Check the driver provider's website for an updated driver.
-
If the updated driver fails to solve the problem, go to the next step.
Step 4: Check and reset hardware
Resetting the hardware on your wireless network in the proper sequence can resolve a variety of connection and performance problems.
-
From the Start screen, type shut down, and then select Turn off your PC from the search results.

-
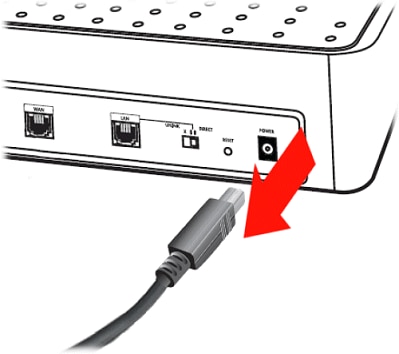
If your network includes a wireless router, wireless gateway or wireless modem/router combination, unplug the power cord.
-
If your network includes a separate broadband modem, unplug the power cord from the broadband modem.
-
Wait for about 5 seconds, and then plug the power cord into the wireless router (and broadband modem, if separate).
-
Wait until all lights come on and reflect normal Internet and PC activity. If the lights on the broadband modem indicate a problem, use this list of options for help:
-
If all lights are off after reconnecting the power, check the power source by plugging the power cord into another power outlet. Service or replace your broadband modem if it cannot be turned on.
-
If only the power light is on and the remaining activity lights are off or show no activity, a network connection is not being detected. Make sure the cable carrying the Internet signal is connected to the broadband device. Make sure Internet cables coming into your residence have not been damaged or disconnected. You might need to contact your Internet service provider if other people in your area are also experiencing Internet outages.
-
If the Internet or Online light consistently blinks and does not indicate an online connection is available, the problem likely resides with your Internet service provider. Either wait until service is restored or contact your Internet service provider for further assistance.
-
-
Turn on your computer and wait until Windows opens. If you are using a notebook computer, perform a hard reset at this time.
-
Wait until Windows automatically connects to your wireless Internet connection.
If Windows does not automatically connect, click the Network Connection icon
 in the notification area, and select the name of your wireless network.
 -
Click Connect.
A window might open prompting you for a password or push button connect actions depending on the type of security you are using.
-
If you can connect to the network and to the Internet, you are done. If not, continue with the next step.
Step 5: Perform a Microsoft System Restore
If the computer was working on the wireless network in the past, but now cannot connect or performs poorly, use Microsoft System Restore to restore your system files back to a date and time when wireless networking was working well. For more information about how to use System Restore, see Using Microsoft System Restore (Windows 8).
Step 6: Other things to try
If your computer is still experiencing Wi-Fi connection or performance problems, one of the following sections might help resolve the issue.
Change your wireless environment
Environment can greatly impact the effectiveness of your wireless network. Review the following conditions and recommended actions to improve your wireless network experience.
| Issue | Recommended action |
| The farther the computer is from the router, the weaker the broadcast signal. | Move the computer and router closer to each other. If you have a notebook computer, move the computer to several locations within your environment while looking at the signal strength indicator in the lower right corner of the Windows desktop. Choose a location where signal strength is the strongest. |
| Solid objects, such as walls, metal furniture, and electrical appliances decrease the range or can block connections. | If possible, remove metal objects that are near or between the router and computer. Move the computer or router to a location where there are fewer solid objects between the two. |
| Performance drops and there are multiple devices being used on your network. | Limit the amount of devices that use the network at the same time, especially when watching videos streamed from the Internet. |
When choosing a location, minimize the amount of solid objects between them, especially electronic devices and metal objects. If you find that the wireless connection is still weak or has trouble connecting, consider purchasing a different antenna for your router or set up another router as a signal repeater.
Restore BIOS settings for your computer to default settings
If other devices can connect to your wireless network, but your computer cannot connect, a BIOS setting might be the cause of the problem. Use the section that matches your type of computer for specific BIOS reset steps:
Notebook PCs
To restore BIOS settings for HP notebook computers:
-
Restart your notebook.
-
During startup, press F10 repeatedly until the BIOS menu displays.
-
Once the BIOS menu displays, press F9 to restore factory defaults.
-
Select Yes to confirm.
-
Press F10 to save changes and exit.
-
Select Yes to confirm.
The computer restarts using the default settings.
Desktops and All-in-One PCs
To restore BIOS settings for HP desktop and All-in-One computers:
-
Restart your computer.
-
During startup, press F10 repeatedly until the BIOS menu displays.
-
In the File tab, use the up or down arrow keys to select Default Setup, and then press enter.
-
Use up or down arrow keys to select Restore Factory Settings as Default.
-
Select OK to confirm.
-
Press F10 to save changes and exit.
-
Select Yes to confirm.
The computer restarts using the default settings.
After restoring the default BIOS settings, if you can connect to the network and to the Internet, you are done. If not, continue with the next step.
Reset your router settings (advanced)
Your wireless router has settings stored in firmware that might interfere with your computer's ability to connect or perform well (channel selection and band for example). Resetting the firmware settings on your router and re-establishing connections for all the devices that use the router is a good way to start over and fix many types of wireless related issues.
Use the following steps as a general guideline, but refer to the documentation that came with your router for detailed instructions or in the event these steps do not work for your router.
-
Connect your computer to the router using a supported network cable.
-
Open an Internet browser and enter the default IP addresses for your router into the browser URL address field.
note:
These default IP addresses, names and passwords are provided for informational purposes only and might not work with your router model. If this information does not allow you to log in to your router's setup page, refer to the User Guide that came with your router.
Router Brand Name
Router IP Address
User Name(s)
Password(s)
3Com
http://192.168.1.1
admin
no password required, or admin
Belkin
http://192.168.2.1
no user name required, or admin
no password required
D-Link
http://192.168.0.1
admin, or user
no password required, or admin
Linksys
http://192.168.1.1
admin, no user name required, or Comcast
admin, no password required, or 1234
Netgear
http://192.168.0.1
admin
password, 1234, or setup
-
Enter a user name and/or password.
-
When you have administrator access to the router, change the default name (or SSID) of the router.
-
Set up Wi-Fi Protected Access (WPA) or wireless encryption (WEP), to prevent other computers from connecting to your home network.
-
Enter a network access password, sometimes called a passphrase. Make sure to pick a password that is easy to remember, such as a phone number that you dial often or a phrase that is familiar.
Change the channel band selection on your router (improve performance)
If your computer can connect to the wireless router but performance is poor or the connection drops, changing the wireless channel band might help. Changing the wireless channel works best for 2.4 GHz routers and environments with lots of wireless network activity, such as apartment buildings.
The steps you need to change the wireless channel depend on the brand and model of wireless router you are using. You can use the following general steps to change the channels for most of the popular wireless routers. If these steps do not work, refer to the user guide that came with your router.
-
Connect your computer directly to the router using a supported network cable.
-
Open an Internet browser and enter the default IP addresses for your router into the browser URL address field.
note:
These default IP addresses, names and passwords are provided for informational purposes only and might not work with your router model. If this information does not allow you to log in to your router's setup page, refer to the User Guide that came with your router.
Router Brand Name
Router IP Address
User Name(s)
Password(s)
3Com
http://192.168.1.1
admin
no password required, or admin
Belkin
http://192.168.2.1
no user name required, or admin
no password required
D-Link
http://192.168.0.1
admin, or user
no password required, or admin
Linksys
http://192.168.1.1
admin, no user name required, or Comcast
admin, no password required, or 1234
Netgear
http://192.168.0.1
admin
password, 1234, or setup
-
Enter a user name and/or password.
-
Scan through the setup pages on the web form to find the channel selection settings.
-
Write down the name of the channel that your router is currently using in case you need to change it back.
-
Select another number and save your settings. For example, if the channel is set to 6, select channel 1 and save.
-
Test your wireless devices on your network to see if performance has improved. If not, you can repeat these steps and try another channel until you find one that works well.
Update the router firmware to troubleshoot a network connection
Outdated firmware might affect performance, security, or prevent the router from accessing the Internet or certain webpages. Log in to the configuration menu for the router (as was done in the previous section) and use the menu to update the firmware dedicated to the router. Consult the User Guide that came with your manual for information on how to perform a firmware update. It is a good idea to connect the computer directly to the router using its network cable when doing the firmware update.
Configure wireless power options (cannot connect after returning from sleep mode)
Most wireless devices can be turned off by the system to save power. In some sleep scenarios, the device might wake properly when the system returns from sleep or hibernate. To prevent this from happening, adjust the power management settings for the wireless adapter.
-
From the Start screen, type device manager to open the Search charm, and then select Device Manager from the search results.
-
Double-click Network Adapters to expand the list, right-click the wireless (Wi-Fi) adapter in the list, and then select Properties.

-
In the adapter properties window, click the Power Management tab.
-
Remove the check mark next to Allow the computer to turn off this device to save power, and then click OK.
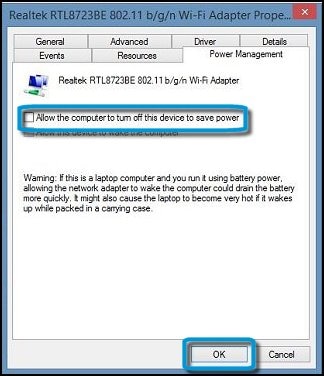
Close the Device Manager, restart the notebook computer, and attempt to reconnect to the wireless network.
Perform an HP System Recovery
If your computer originally came with Windows 8 and has HP Recovery Manager, you can use it to remove all software and restore your computer's original software configuration. Before using this option, make sure you back up all of your important files. For more information, refer to Performing an HP System Recovery (Windows 8)
Service the computer
If you have tried the actions in this document and cannot establish a connection or the wireless connection continues to perform poorly, your wireless adapter card might need to be reseated or replaced. Service the computer to replace or repair the wireless adapter hardware.
How to Turn on Wifi on Windows 8 Laptop
Source: https://support.hp.com/id-en/document/c03535285